
Quick Answer: Most skylight leaks start at the unit-roof interface, not in the glazing. The head flashing, step flashing, and base apron actually keep water out: one failure there reads like a leak.
Water tracks down the inside of a skylight shaft, or a brown ring spreads across the ceiling below one, and the instinct is to blame the glass overhead. Skylights are built to shed water and maintain a seal for decades, and they usually still do that job. Most of the time the leak belongs to the roof around the skylight rather than to the skylight itself.
The Skylight Usually Isn't the Leak
A factory-built skylight arrives as a sealed, tested unit: double- or triple-glazed panels bonded into a frame that's checked for weathertightness before it ever leaves the plant. Everything around it isn't factory-built. The connection between that unit and the roof deck is assembled on-site, on a ladder, layer by layer, in whatever weather the installation day brings. That field-built joint is where the odds of a leak actually live.
This matters for diagnosis as much as for blame. A homeowner staring at a wet ceiling reasonably assumes the skylight failed, and the fastest wrong move is treating that assumption as fact: caulking the visible seam and hoping. The more useful question is where, specifically, the water crossed from outside to inside, and that almost always traces back to how the unit was tied into the shingles and decking around it, not to the glass overhead.
Curb-Mounted vs. Deck-Mounted: Different Skylight, Different Risk
Not every skylight sits on the roof the same way, and the mounting style changes where water has to be managed. A curb-mounted skylight sits on a raised wood frame, the curb, built up several inches above the roof deck before the unit is set on top of it. That height keeps the glazing well clear of standing water and gives the flashing something substantial to wrap around.
A deck-mounted skylight sits almost flush with the roof surface, with its own integrated frame doing the job the curb would otherwise do. It has a lower profile and a cleaner look, but it also sits closer to whatever water and debris move across that section of roof, which puts more weight on the flashing kit doing its job correctly the first time. Low-slope sections lean toward curb-mounted units for exactly this reason: the extra height matters more where water drains slowly, and a taller curb also gives an installer more room to lap the flashing properly on all four sides.
The Flashing Kit Works as One System
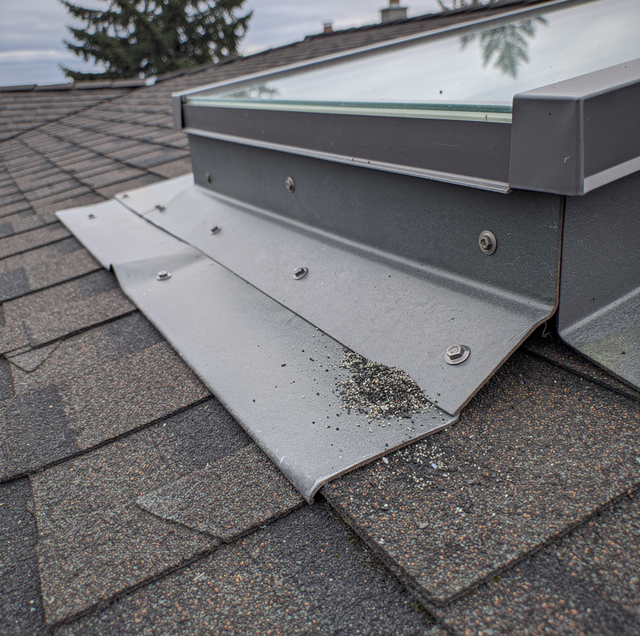
A proper skylight flashing kit comes in four separate pieces, each handling a different edge of the unit. Head flashing spans the top edge, where it meets the highest point of water flow. Step flashing runs up both sides, one small L-shaped piece tucked under each course of shingle as the roofer works upward, so every course overlaps the one below it, and water is handed downward from piece to piece. An apron, or base flashing, sits along the bottom edge, directing water that has already passed the skylight back onto the roof surface below. Water always moves from a higher piece onto a lower one; that order is the whole point of the system.
Each piece depends on the others being installed in the correct sequence and layers. Step flashing must be installed during shingle installation, not after, because each piece needs to sit under the course above it and over the course below. A one-piece peel-and-stick wrap substituted for that sequence looks like a shortcut that saves a step, but it caulks the surface instead of layering the water path, and any water that gets underneath it has nowhere to drain back out. The four pieces are sized and sold as a matched kit for a reason: swapping in a mismatched or generic piece breaks the lapping order the rest of the kit depends on.
Ice and Debris Damming Above the Head
On a low-slope roof, moving water slows as it reaches the upslope edge of a skylight, and whatever it is carrying settles there. Granules, needles, and leaf litter collect along that edge, where the roof surface meets the curb on a curb-mounted unit or the integrated frame on a deck-mounted one, because that is the first obstruction the water runs into. Over the wet season, that debris packs down into a small dam directly above the head flashing, exactly where the flashing does its heaviest work. A wider skylight on a low-slope section sometimes gets a small built-up cricket above it for this reason, a shallow diverter that splits water and debris around the unit instead of letting it collect against the upslope edge.
Freezing weather makes the same problem worse through a different mechanism. Meltwater refreezes at the cooler edge above the skylight, building an ice dam that backs standing water up under the shingle courses instead of letting it drain past. Water under pressure from a dam behaves differently than water running off in a sheet: it finds the smallest gap in a shingle lap or a flashing seam and pushes through it, rather than sheeting harmlessly past.
Clearing debris or inspecting flashing above a skylight means walking the roof, and that's a job for a professional. A fall risk is only part of it: foot traffic on wet shingles can crack the granule bond and start new damage.
The Glazing Seal: The One Real Skylight Failure
One part of a skylight leak does belong to the skylight: the gasket and sealant that hold the glazing to the frame. That seal is a manufactured component with a service life of its own, and it degrades through sun exposure, thermal cycling, and simple age. When it fails, water gets in at the glass-to-frame joint itself rather than anywhere the roof connects to the curb.
This failure is less common than a flashing failure, but it's real, and it's the one case where "the skylight" is the accurate answer to "what's leaking." It usually shows up as water tracking down the inside of the glass or pooling at the bottom corner of the frame, rather than staining the ceiling several feet away, which points at the flashing instead. A roofer checking for it will run water directly on the glass-to-frame joint first, isolated from the roof deck around it, before ever touching the flashing.
Condensation or a Leak? How to Tell the Difference
Moisture around a skylight isn't always a leak. Warm, humid indoor air meets cold glass or a cold metal frame and condenses on the inside, just as it beads on a cold drink on a humid day. That moisture can drip, pool on the sill, and look exactly like a leak to anyone who hasn't seen the difference before.
Timing is the clearest tell, with one winter exception. Condensation shows up during cold snaps, right after a shower, or while cooking, and it tracks with indoor humidity rather than with weather outside. A real leak shows up during or shortly after rain, and it keeps happening in wet weather regardless of what's going on inside the house. The exception is snow. Cold-weather moisture with no rain reads as condensation only when the roof is clear of snow and ice; with snow sitting up there, or during and after a thaw, that same moisture is a leak, because an ice dam above the head flashing pushes water under the shingle courses on a day nothing fell from the sky. Location and texture help too: condensation forms a thin film evenly across the frame's perimeter, while a leak tends to trace a single wet path from a specific point.
Wipe the frame dry and check it again the next morning. A film that returns on a dry night points to indoor humidity over 50 percent; water tracing one path after rain, or with snow on the roof, needs a roofer.
Why the Stain Shows Up Feet from the Skylight
A leak often appears on the ceiling a few feet from the skylight's edge, and that distance throws people off the trail. Water lands on the decking or runs along the top of a rafter inside the roof assembly, rather than dropping straight through the way it would through open air, then follows whichever way that surface slopes or tilts before finding a gap, a nail hole, or a low point in the insulation where it can finally reach the ceiling.
That's why chasing a stain by looking straight up from it usually fails. The entry point is uphill from where the water finally shows itself, sometimes by more than a foot, and a run of rafters or a seam in the drywall can carry it sideways again before it drips. Tracing a leak properly means following the framing back toward the skylight, not assuming the source sits directly above the mark on the ceiling.
A Real Repair Means Reflashing, Not Caulking
Running a bead of sealant around a leaking skylight is the fix almost everyone reaches for first, and it's the one that makes the next repair harder. Caulk bridges a gap rather than shedding water the way flashing does, and it doesn't move the way roofing materials do with temperature changes. It cracks within a season or two, traps moisture underneath itself instead of letting it drain, and hides the actual failure point from the next person who has to find it. Deck and framing can sit wet under a bead of caulk for months before anyone notices, because the surface looks sealed even while the water underneath keeps working.
A proper repair means pulling back the shingle courses around the skylight, removing the failed flashing pieces, and rebuilding the head, step, and apron flashing in the correct layered order before the shingles go back down. That's roofing work, not a caulk-gun job, and it's the only way to actually restore the layered water path the flashing kit was designed to create in the first place. A roofer working a genuine flashing failure will usually tarp the area temporarily to stop active water intrusion while confirming the cause, rather than reaching for sealant as anything more than a short-term stopgap.
Frequently Asked Questions
Yes, if the wrong underlayment went in underneath it. Felt paper alone at the head of a skylight doesn't hold up the way a self-adhering ice-and-water membrane does, and that membrane belongs under the head flashing on every install, not just where hard freezes are common.
Not usually. The trim around the opening on the ceiling side is a finish piece, cosmetic drywall or wood trim, and sealing it only hides where water is currently showing up. The water crossed the roof plane well before it ever reached that trim, so the actual entry point stays open.
Yes. Rain blown sideways by strong wind can push up under a step flashing lap that would shed a normal vertical rainfall without issue, which is why a skylight can leak only in certain storms and stay dry through others with just as much total rainfall.
No. The curb height, the flashing kit, and the rough opening in the deck are all sized to match one mounting style. Switching from one to the other means replacing the unit and rebuilding the opening, not just swapping the flashing around it.
Often, yes. Flashing metal and the sealant strips built into it age on the same clock as the shingles around them, due to UV exposure and temperature swings, so most roofers replace a skylight's flashing kit whenever they reroof that section rather than waiting for a separate failure.
It can be. The deck around a skylight opening is cut and framed with extra headers and trimmers to carry the load that the missing joists would have carried, so water reaching that framing has less distance to travel before it reaches structural wood rather than just roofing material.
Get a skylight leak traced to its real source — the flashing, the seal, or something else entirely. 3D Established Roofing serves Nanaimo, Lantzville, and Parksville. Call (236) 508-8008.
